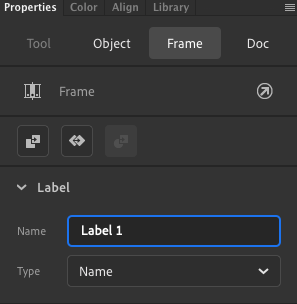


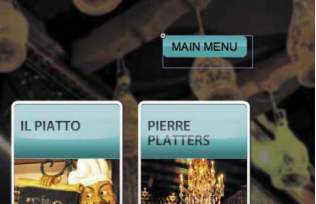


 In this post I had to add computer coding and create a layer that contained it in order to allow my restaurant Guide animation to play with all the changes I made in my previous blog post.But before I added this code I had to first label each keyframe in my content layer so I can distinguish between them easily without getting them mixed up.In order to do this I had to select each individual keyframe on the content layer I created last time and go to my projects properties panel so I can pick the frame option from the panel and title it label with a number at the end which automatically appears on the keyframe I wanted to change.For example If I decided to rename the keyframe thats present on frame 10 all I would need to do is select it and use my selection tool to pick my properties panel that appears to the left of my project workspace and select the Frame option so I can type label1 which suddenly appears on frame 10 once I press enter on my keyboard.I then made sure to add the main menu to my restaurant guide by selecting my library panel from the left side of my project workspace and taking the notion to unlock/open the buttons folder so Im then able to click and drag the main menu button from the library panel onto my stage where my restaurant guide wallpaper and buttons are placed.The moment I dragged it onto my stage I had to take the time to reposition the button to hover over my first button and rename it from my properties panel under button with the name mainmenu_btn. The next thing I had to do is create a new layer by selecting the create newer layer icon which is just a plus sign in the middle of a square and renamed it actions after doing this simple task I then made sure to move it to the very top of all my layers in my timeline panel.Once I did this I was then able to focus on applying or adding some computer coding to my actions layer by making selecting the actions layer with my selection tool and opening the actions panel and following the directions the book instructed about what button to press and what to type for the code whether its a .this Stop (): code or so forth.The next and last thing I had to do for this blogpost is create 4 or 6 new layers under my actions panel and rename place the coding I just created to each one by creating a new keyframe and placing the code individuals for each section which a certain directive or function.I also made sure to test my movie once I finished everything from the book to see if I made any mistakes with my coding and to test each button of my finished restaurant guide animation.
